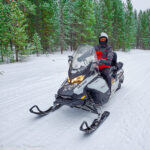
Are you ready to take control of your snowmobiling experience? Here’s an article that breaks down the fundamental steps of adjusting the suspension on your snowmobile. This handy guide transforms the seemingly complicated process into a manageable set of instructions, providing you with an easy and efficient framework of knowledge. Whether you’re an expert or beginner on the sled, understanding these adjustment techniques will ensure you are prepared for any snowy terrain thrown your way. Holly jolly ride, anyone?
Understanding Snowmobile Suspension
Snowmobiling is undoubtedly an exhilarating experience, but your ride will only is smooth if your snowmobile’s suspension is in good working order. A snowmobile suspension absorbs impacts and vibrations from the terrain, enhancing the ride’s comfort and stability.
Concept of Suspension
The suspension system of a snowmobile consists of springs and shock absorbers that counteracts bumps and jumps while you ride. It improves the interaction between the snowmobile and the surface, allowing for a smoother operation. It’s located both at the front and the rear of the snowmobile, helping maintain alignment and balance.
Types of Snowmobile Suspension
The two key types of snowmobile suspension are the front and rear suspensions. The front suspension, also known as an Independent Front Suspension (IFS), is designed to soak up the impact from the terrain independently on each side. The rear suspension, on the other hand, offers a sliding motion that suits the terrain’s contours, increasing the snowmobile’s handleability and control.
Purpose of Adjustable Suspension
The primary purpose of adjustable suspension is to enhance the performance of your snowmobile by modifying it according to your weight, riding style, and the terrain. Through these adjustments, not only can you optimize your snowmobile’s comfort and performance, but you can also address potential issues such as sagging, bottoming out, or rigid rides.
Preparation for Suspension Adjustment
Before you venture into adjusting your snowmobile’s suspension, it’s important to prepare adequately.
Tools Required
You’ll need a few essential tools to adjust your snowmobile’s suspension such as a shock preload adjustment wrench, a low-pressure air pump for air-shock adjustment, and a torque wrench to fasten bolts to their specific torque values.
Safety Measures
Always ensure your snowmobile is parked on a flat and stable surface. Work in a well-lit and ventilated area, wearing protective gear such as gloves and safety glasses.
Assessing the Condition of Your Suspension
Despite regular maintenance, your suspension might develop issues such as sagging or stiffness. To assess its condition, test its movement by standing on the running boards and bouncing a few times. The snowmobile should rebound once and settle. If it oscillates, your shocks might need refurbishing.
Adjusting the Front Suspension
The front suspension is crucial to a smooth ride. It’s typically made up of two separate shock absorbers, one on each ski, which can be adjusted independently.
Locating the Front Suspension
The front suspension is located underneath the belly pan, connected to the skis. Each ski has its individual shock absorber and spring.
Understanding the Adjustment Process
The adjustment process involves tweaking the suspension’s spring preload, which changes the initial tension on the spring, to affect how much force is needed to compress it.
Steps to Adjust the Front Suspension
To adjust the front suspension, locate the adjustment nut on the shock absorbers. Then, using your wrench, turn the nut clockwise to increase the spring preload and counter-clockwise to reduce. Always adjust both sides evenly to maintain balance.
Adjusting the Rear Suspension
The rear suspension provides the traction and comfort you need to enjoy your ride across diverse terrains. It’s typically made up of two sets of shock absorbers and springs known as the front-arm and rear-arm shocks.
Locating the Rear Suspension
The rear suspension is situated in the tunnel, connecting the track to the chassis.
Understanding the Rear Suspension Adjustment
Adjusting the rear suspension involves altering the spring preload and/or shock absorbers. It helps to tweak the sled’s weight transfer, ride height, and how firmly or softly the machine rides over bumps.
Steps to Adjust the Rear Suspension
Locate the adjustment nut on your rear shocks. To increase spring preload (for a stiffer ride), turn the nut clockwise. To decrease preload (for a softer ride), turn the nut counterclockwise. Remember to adjust both rear-arm and front-arm shocks equally.
How to Adjust Shock Absorbers
Shock absorbers play a pivotal role in controlling the spring and suspension movement. Below is how you can adjust them.
Function of Shock Absorbers
Shock absorbers dissipate the energy the springs produce when they compress and rebound, keeping your snowmobile stable. They also reduce bounce, helping to maintain contact with the ground.
Locating the Shock Absorbers
The snowmobile has multiple shock absorbers located in its front and rear suspension systems.
Adjustment Tips and Techniques
Typically, snowmobile shock absorbers have an adjustable dial to control damping—the rate at which the shock compresses and rebounds. The adjustment dial ranges from soft (usually indicated by a minus) to hard (indicated by a plus). Turn towards plus for a stiffer response and towards minus for a softer one.
How to Adjust the Spring Preload
The spring preload adjustment controls ride height and sag, affecting both ride comfort and handling.
Understanding Spring Preload
Spring preload is essentially the tension applied to a shock absorber’s spring when your snowmobile is at rest. Adjusting it can alter the ride height and the responsiveness of the springs.
Locating the Spring Preload
The spring preload adjustment is typically located at the top of your shock absorbers.
Adjusting the Spring Preload
Using your adjustment wrench, turn the preload adjustment nut. Clockwise turns will increase preload and ride height while counterclockwise turns will decrease.
Suspension Tuning Guide
Suspension tuning is a systematic way of making adjustments to your sled’s front and rear suspension systems to optimize their performance.
Understanding Suspension Tuning
Suspension tuning involves making a series of adjustments and then testing the results on your typical riding terrain. The goal is to strike a balance between stability and comfort, tailored to your riding preferences.
Tips for Successful Tuning Process
Be sure to make one adjustment at a time, recording what you did and noting the results. This way, you can revert to a previous setup if you’re not happy with the outcome. Also, be patient—tuning is a trial-and-error process.
Common Mistakes to Avoid During the Tuning Process
One of the most common errors newbies make is adjusting the shocks too stiff, leading to a harsh and uncomfortable ride. Always start with softer settings and work your way up as necessary.
Post-adjustment Testing and Review
After making your adjustments, it’s time to put your snowmobile to the test.
Balancing and Alignment
Check whether your snowmobile is well-balanced and aligns by pushing it from side to side and feeling for sudden dips or slow responses. Imbalances could mean that your front or rear suspensions aren’t adjusted equally.
Performing Test Rides
Take your snowmobile out on your typical terrains for test rides. Pay attention to how it responds to different types of bumps and your overall comfort and performance.
Observation of Changes and Further Adjustments
From your test rides, decide whether the adjustments have improved your ride or not. If not, go back to the drawing board and tweak your adjustments.
Regular Maintenance of Snowmobile Suspension
To ensure the longevity of your snowmobile’s suspension components, regular maintenance is essential.
Importance of Regular Maintenance
Regular suspension maintenance ensures a smoother ride, extends the life of your components, and prevents potential breakdowns in the middle of your adventures.
Inspection of Suspension Parts
At least once a season, conduct a careful inspection of your shocks, checking for leaks, and listening for unfamiliar sounds. Also, examine the springs for deformity or corrosion.
Guide to Regular Maintenance Procedures
Routine maintenance could include cleaning and greasing suspension components, adjusting sag and damping settings for the new season, and checking and tightening all fasteners.
Troubleshooting Common Suspension Problems
Knowing how to quickly spot and fix common suspension issues can save your day on the trails.
Identifying Common Suspension Problems
Common issues include a sagging suspension, persistent bouncing, harsh riding, and the machine leaning to one side.
Tips on Finding Quick Solutions
For a sagging suspension, try to increase the spring preload. If your ride is too bouncy, increase the shock absorbers’ damping. A harsh ride may require you to soften the shocks or reduce spring preload.
Knowing When to Seek Professional Help
In case of persistent issues or any major problems like shock absorber leaks, it’s best to enlist a professional mechanic’s help. Their expertise can ensure your snowmobile’s safety and optimal performance.
- What Snowboard Bindings Should I Get? - January 23, 2024
- What Size Screws For Snowboard Bindings? - January 23, 2024
- How To Snowmobile On Water? - January 23, 2024


