Are you finally ready to ditch those rental boards and establish your own ride? Good for you! But snowboarding isn’t solely about getting the best board; equally important is learning how to mount your snowboard bindings. This enlightening piece entitled “How to Mount Snowboard Bindings” is custom-made for you. It’s a step-by-step guide that will confidently walk you through the simple yet crucial process of mounting your snowboard bindings. Say goodbye to incorrectly positioned bindings and awkward stances, and start shaping your thrilling snowboarding experience.
Understanding Snowboard Bindings
When you’re hitting the slopes, it’s easy to overlook the importance of snowboard bindings. However, these crucial pieces of equipment play a vital role in your snowboarding experience by securing your boots to your board. They act as the liaison between you and your board, allowing you to control its movements during your ride. Understanding the different types of bindings and how to choose the right size will enhance your performance and overall snowboarding experience.
The role of snowboard bindings
Snowboard bindings serve as the direct connection between you and your board. They’re what keep your feet anchored onto the board, and they’re what give you the control you need to pull off tricks, navigate turns, and maintain balance. By allowing you to transfer your body movements and weight shifts directly onto the board, bindings enable you to steer and control your ride effectively.
Types of snowboard bindings
Not all snowboard bindings are created equal. There are several types to choose from, each catering to different riding styles and levels of experience. Some of the common types include strap-in bindings, step-in bindings, and speed entry bindings. While strap-in bindings are the most common and provide a solid amount of control and versatility, step-in and speed entry bindings offer ease of use and convenience in different situations.
Choosing the right binding size
The size of your snowboard bindings is highly dependent on your boot size. Binding sizes typically come in small, medium, and large, with each size covering a range of boot sizes. It’s essential that you select the correct size as ill-fitting bindings can be uncomfortable and can hamper your performance on the slopes.
Items Needed for Mounting Snowboard Bindings
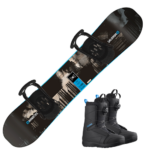
The process of mounting your snowboard bindings is straightforward, but it does require a few key items. These include your snowboard, bindings, boots, the specific hardware that came with your bindings, and a snowboard tool or Phillips-head screwdriver.
Snowboard, bindings, and boots
Before you begin the process of mounting your bindings, you’ll need to have your snowboard, bindings, and boots on hand. Your snowboard should be clean and free from any snow or moisture. Your bindings should be right for your boot size, and your boots should fit well and offer good support.
Specific Hardware
The specific hardware you need will depend on the type of bindings you have. Most bindings come with four screws and washers that will be used to secure each binding to your snowboard. Some bindings also include a disk that is placed between the binding and the snowboard.
Snowboard tool or screwdriver
To tighten the screws, you’ll need either a snowboard tool or a Phillips-head screwdriver. A snowboard tool is specifically designed for mounting snowboard bindings and usually includes different screwdriver heads to fit various types of screws.
Deciding on Binding Placement
Determining where to place your snowboard bindings on your board is crucial. It impacts your stance, which subsequently affects your riding style, control, and comfort on the slopes. Choosing the right stance, determining your stance width, and setting your binding angle are all part of this process.
Choosing the right stance
Your stance is the direction in which you stand on your snowboard. It can either be “regular” (left foot forward) or “goofy” (right foot forward). This largely depends on your dominant foot.
Determining your stance width
Stance width refers to the distance between the center of your front and rear bindings. Your stance width should roughly align with the width of your shoulders for optimum balance and control.
Setting your binding angle
The angle at which your bindings are set affects how your feet sit on the board. A common starting point is setting the front binding at an angle of +15 degrees and the rear binding at 0 degrees. You can adjust these angles based on your comfort and preferred riding style.
Positioning the Bindings on the Board
Mounting your snowboard bindings involves positioning them correctly on the board and aligning them with the binding holes. It’s crucial to follow these steps meticulously to ensure maximum performance and safety.
Locating the binding holes
The first step in positioning your bindings on the board is to locate the binding holes. These are the series of pre-drilled holes on your snowboard where the binding screws will be inset.
Aligning the bindings with the holes
Once you’ve located the binding holes, align your bindings with them. The number of holes you should use will be indicated on the mounting disc of your bindings. While alignment, ensure the bindings are centrally placed on the board for balance.
Positioning for front and back bindings
It’s important to remember that the positioning for front and back bindings might vary depending on your chosen stance and the type of riding you’ll be doing. For instance, freestylers may prefer a centered stance, while free-riders may opt for their back binding slightly towards the tail of the board.
Attaching the Bindings
After correctly positioning the bindings, the next step is securing them to the board. This is where you’ll leverage the mounting disc system to derive a firm and safe grip.
Understanding the mounting disc system
The mounting disc system is central to attaching your bindings. This is the disc that comes with your bindings and allows you to adjust your stance width and angles. It fits into the baseplate of your bindings and is what holds your bindings to your board.
Placing the disc inside the binding baseplate
To place the disc inside the binding baseplate, first, line up the holes on the disc with the holes on the baseplate. Once aligned, insert the screws through the holes on your binding’s baseplate and into the corresponding holes on your snowboard.
Screwing the bindings onto the board
With your bindings and disc lined up with the holes on your snowboard, start screwing the bindings onto the board. Ensure the screws are firm but not too tight – you don’t want to risk damaging your snowboard.
Mounting Hardware and Safety Check
After securing the bindings to the board, you must double-check all screws and bindings to ensure they’re tight and secure. Regular safety checks and maintaining your bindings will promote longevity and safety while on the slopes.
Tightening the bindings
Ensure all screws are tight enough to hold your bindings securely in place on your board. However, be careful not to overtighten, as it can damage your bindings and board.
Double-checking all screws and bindings
Go over all screws and bindings again to assure everything is tightened and secured properly. Loose bindings can pose a risk on the slopes as they could lead to loss of control or sudden release.
The importance of regular safety checks
Regular safety checks are paramount when it comes to snowboarding gear. By regularly inspecting your bindings, you can spot any issues early on and ensure your equipment is always in optimal condition.
Fine-tuning Your Stance
Once your bindings are mounted, you still have room to tweak things and optimize your stance. By adjusting your binding angles and stance width, you can optimize for comfort and performance.
Adjusting binding angles
Your binding angles heavily influence your snowboarding posture and riding style. It is worth experimenting with different angles to find the one that feels most comfortable and conducive to the way you want to ride.
Modifying stance width for comfort and performance
Your stance width can affect your comfort and performance while snowboarding. A stance that’s too wide can make it difficult to turn, while one that’s too narrow can lead to instability. Try different stance widths to find the one that suits you best.
Trying out different stances
Whether you’re a beginner looking for the right stance or an advanced rider wanting to explore new techniques, it’s always a good idea to try different stances. Switching up your stance not only provides a fun challenge but can also enhance your skills and make you a more versatile rider.
Testing Your Mounted Bindings
Once you’ve mounted your bindings, it’s time to test them out.
Performing a dry-land test
Before you head to the slopes, perform what’s known as a “dry-land” test. This involves stepping into your bindings and boots and moving around a bit. You’re looking to see if your boots are firmly secured and if the movement of the board matches your expectations.
Checking for a snug fit of boots in bindings
Your boots should fit snugly into your bindings, with no lateral movement. This is crucial for maintaining control over your board and staying safe while snowboarding.
Ensuring ease of movement and control
Check to ensure the bindings allow you to move with ease and offer good control over your board. If it feels off, reassess the position, size, and fit of your bindings.
Troubleshooting Common Issues
Mounting bindings is usually a smooth process, but occasionally you may encounter issues. Common problems include loose bindings, bindings that don’t fit the board, and signs of wear and tear.
Addressing loose bindings
If your bindings feel loose, check the screws. They may not have been tightened enough, or they may have loosened with time. Always have a snowboard tool or screwdriver handy so you can adjust as required.
Dealing with binding-to-board incompatibility
In some cases, your bindings may not be compatible with your snowboard. This can often be resolved by adjusting the positioning or using a different hole pattern. If compatibility issues persist, it may be best to get professionally fitted bindings.
Recognizing signs of wear and tear
Frequent use, falls, and the robust nature of the sport can lead to wear and tear on your bindings. It’s critical to keep an eye out for any visible damage, including cracks, frays, or worn-out parts. Promptly replace any flawed or broken parts to keep your gear safe and high-performing.
Maintaining Your Snowboard Bindings
Proper maintenance of your snowboard bindings can extend their lifespan, enhancing your safety, and maintaining top-notch performance.
Regular inspection for damage
Frequent inspections will help you to catch any signs of damage early. Regular checks after each session on the slopes will ensure that your bindings are in good working condition and safe to use.
Cleaning and storing your snowboard and bindings
After each use, clean off any snow or dirt from your bindings and dry them properly before storage. This can help prevent rust and other damage. Store them in a cool, dry place, away from direct sunlight.
Replacement of flawed or broken parts
Should you notice a part is damaged or broken during one of your routine inspections, replace it immediately. Deteriorated parts can lead to poor performance and potential accidents. It’s also a good idea to have some spare parts, such as screws or straps, on hand should you need them.
In summary, while mounting your snowboard bindings may appear complex at first glance, careful preparation and attention to detail will simplify the process. Properly mounted bindings enhance your control, improve your comfort, and heighten your overall snowboarding adventure. Happy shredding!
- What Snowboard Bindings Should I Get? - January 23, 2024
- What Size Screws For Snowboard Bindings? - January 23, 2024
- How To Snowmobile On Water? - January 23, 2024

