Venturing into the chilly outdoors armed with your MSR Evo Snowshoes, but unsure how to properly put them on? Fear not. This article will guide you through every step of the process. Fight back against the snow and ensure you’re ready for anything this winter throws at you by mastering the proper way to wear your MSR Evo Snowshoes. Read on to equip yourself with the knowledge you need to brave the elements with confidence.
Understanding the Parts of MSR Evo Snowshoes
Prior to using your MSR Evo Snowshoes, it is important for you to acquaint yourself with the different components of your gear. This knowledge will not only enhance your usability but also ensure safety during your adventure.
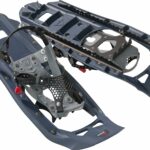
Identifying the platform
The platform of the MSR Evo Snowshoes, often referred to as the deck, is the part you’ll step on. It is usually manufactured from either plastic or a composite material that is lightweight yet durable enough to withstand various snow conditions.
Examining the bindings
The bindings of the snowshoe are the components that secure your boots to the deck. They are typically equipped with mechanisms that allow for adjustments, ensuring a snug fit regardless of the size or type of boots you are wearing.
Identifying the crampons
Crampons are sharp tooth-like structures located under the snowshoes, designed to dig into the snow for enhanced traction. These are integral to maintaining stability on varying terrains especially on slopes.
Analyzing the strap system
The strap system of MSR Evo Snowshoes is composed of multiple adjustable straps that are typically found on the bindings and the heel area. They ensure your boots remain firmly attached to the snowshoe while you are moving.
Preparing Snowshoes for Use
Before heading out into the snow, it is essential to do a preliminary check of your snowshoes.
Inspecting snowshoes for damage
Look for any visible signs of wear and tear on the platform, bindings, and crampons. Damaged gear can compromise your safety and performance.
Checking strap system for deformities
Inspect all the straps for any rips, fraying, or loose stitching. Reliable straps are crucial to keeping your boots secured to the snowshoes.
Assuring crampons are free from obstacles
Make sure that there is nothing obstructing the crampons. Obstacles stuck to them can hinder their capacity to grip onto the snow, making you slip or fall.
Selecting the Right Size
Proper fitting snowshoes are integral to your comfort and performance in the snow.
Understanding the significance of shoe size in snowshoeing
Your shoe size plays a significant role in snowshoeing because it aids in weight distribution over the snow. The right snowshoe size based on your weight and the snow conditions will keep you from sinking too deep into the snow.
How to know your suitable snowshoe size
Snowshoes are typically sized based on the total weight they will carry including your body weight and gear. Most manufacturers, including MSR,d provide sizing charts to guide you.
Adjusting MSR Evo Snowshoes to your size
MSR Evo Snowshoes offer adjustability to accommodate your foot size. You can adjust the bindings and straps to create a snug fit that still allows for comfortable movement.
Laying out the Snowshoes
The way you lay out the snowshoes can affect how easy it is to put them on.
Laying snowshoes to begin setup
To start, place your snowshoes on a flat surface. Make sure that the bindings are on top and the crampons are facing down.
Arranging snowshoes correctly on the ground
When arranging the snowshoes, ensure they are side by side with the tips pointing towards you. This arrangement facilitates easier foot insertion.
Preventing snowshoe arrangement errors
Avoid setting your snowshoes on uneven surfaces. You might trip or twist your ankle while trying to put them on.
Positioning Your Feet Correctly
How you align your feet on the snowshoes can impact your walking comfort and control.
Identifying the correct foot position
The correct foot positioning is to place your feet centered in the bindings so that your toes are near the edge of the platform.
Strategically placing your feet in the snowshoe
As you position your feet, make sure there’s a space between your boots and the edges of the snowshoes to avoid friction and discomfort.
Avoiding incorrect foot placement
An unbalanced positioning, such as placing your feet too far forward or backward, can lead to unnecessary strain and a potential compromise to your balance.
Tightening Bindings on the Snowshoes
The bindings should be tightened properly to keep your boots well-anchored to the snowshoes.
Understanding the right binding tightness
The bindings should be tight enough to stop your feet from moving around, but not so tight that they make your boots uncomfortable or restrict movement.
Steps to tighten the bindings
You can tighten the bindings by pulling on the adjustable straps. Each pull tightens the bindings and it is important to do it uniformly to maintain a properly balanced binding setting.
Ensuring bindings are secure
After tightening, recheck the bindings. They should feel snug around your boots without pressing uncomfortably into your feet.
Securing the Heel Strap
Your heel strap is equally important to secure the back portion of your foot on the snowshoe.
Locating the heel strap
The heel strap is located at the back of the binding. It’s designed to secure the rear of your boot on the snowshoe deck.
Tightening the strap for a secure fit
You can tighten the strap by pulling on its free end. Take care to not make it so tight that it causes discomfort on your heel or alters your natural gait.
Checking the strap is comfortable on the heel
After securing the heel strap, you should be able to move your heel up and down without excessive resistance or discomfort.
Adjusting the Toe Strap
The next step involves adjusting the toe strap to ensure good foot placement.
Locating the toe strap
The toe strap is usually located above the toes on your boot and plays a crucial role in securing the front part of your foot.
Tightening the strap for secure foot placement
To secure your toes, pull on the strap until it fits snugly over the front of your boot. Again, watch that it’s not so tight that your toes feel pinched or uncomfortable.
Making sure toe strap does not cause discomfort
Check to ensure that the strap doesn’t dig into your feet as you move. The strap should allow flexible movement of your toes, while keeping them well anchored on the platform.
Check Your Snowshoes are Fitted Properly
The ultimate goal of these adjustments is to ensure a good fit of your snowshoes.
Knowing signs of a good snowshoe fit
A good fit is when your boots are snug in the bindings without any discomfort or restriction in movement. Your balance should also feel natural and not distorted.
Checking toe, heel and binding adjustment
Double check each fitting section. Re-adjust if necessary. The more closely your snowshoes match your foot dimensions and comfort needs, the better you’ll perform in the snow.
Olding & minor adjustments if required
After some usage, your snowshoes might become disadjusted. The bindings may stretch or your boots might deform. Always check your gear and do minor tweaks as necessary before you use them.
Walk Test for Safety
Walking test is important not only to ensure good fit but also safety.
Importance of a walk test
Just like a test drive before buying a car, a walk test in your snowshoes helps you spot any comfort issues before you find yourself out in the middle of a snowy trail.
Performing a basic walk test
A basic walk test should involve walking, climbing, descending, and side stepping to mimic typical snow conditions. It should also include walking over different surface types to test the crampons.
Identifying and adjusting discomfort while walking
If you feel any discomfort, take note of where it is. Remember, what might seem like a minor issue now will likely become a major one after a few hours in the snow. Nip any potential problems in the bud by adjusting the offending strap, repositioning your foot, or switching to a different pair of socks or boots. With these steps mastered, you’re ready to explore the beauty of wintry landscapes!
- What Snowboard Bindings Should I Get? - January 23, 2024
- What Size Screws For Snowboard Bindings? - January 23, 2024
- How To Snowmobile On Water? - January 23, 2024

